Tech / Technology

Your iPhone has built-in rain sounds that help you sleep. Here’s how to play them.

Posted on:

iPhone has a hidden feature that plays nature sounds that help you sleep soundly.
iPhone playing nature sounds

Yes, it’s true! Your iPhone has built-in nature sounds that can be played continuously. If you, like me, doze off to sleep more quickly with white noise playing in the background, you’ll greatly benefit from this little-known iOS trick.

After a quick trip to the Settings app, you can set up your iPhone to play ocean sounds, the pitter-patter of rain, and more. Follow the instructions below to fire up some nature sounds while you sleep.

How to play the built-in nature sounds on your iPhone

Total Time

  • 2 minutes
What You Need

  • iPhone

Step 1:
Tap on the “Settings” app

Settings app on iOS 17


Credit: Kimberly / Mashable

Step 2:
Tap on “Accessibility.”

Accessibility on iOS 17


Credit: Kimberly Gedeon / Mashable

Step 3:
Tap on “Audio/Visual.”

Next, tap on “Background sounds.”

Audio Visual option in iOS 17


Credit: Kimberly Gedeon / Mashable

Step 4:
Tap on the “Background Sounds” button so that it turns green.

In the same Window, click on “Stream” to see other options available to you.

Background sounds on iOS 17


Credit: Kimberly Gedeon / Mashable

Step 5:
Tap on your desired sound.

You can choose between six sounds: rain, stream, and ocean, as well as dark, bright, and balanced noise.

Sounds on iOS 17


Credit: Kimberly Gedeon / Mashable

You can adjust the volume of your white noise selection under “Background Sounds.” Once you’re ready to turn it off, simply switch off the toggle next to “Background sounds.”

Tech / Technology

Samsung’s ChatGPT rival is coming soon to its devices

Posted on:

At Samsung’s 2023 AI Forum, the company introduced its own large language model with plans to incorporate it into Samsung devices.

Days after OpenAI announced ChatGPT-4 Turbo, Samsung unveiled its own large language model (LLM).

On Wednesday, during the Samsung AI Forum 2023, the company introduced its generative AI model, Samsung Gauss, with plans to integrate it into its smartphones, tablets, and laptops.

After Samsung developers accidentally leaked confidential data by using ChatGPT to help write code, Samsung banned the use of ChatGPT on company devices and started building its own generative AI tool for employees to use internally. Now, the company is bringing its own LLM to the public. OpenAI has kept the upper hand on generative AI tools amidst fierce competition with models developed by Google and Anthropic, but it lacks the strategic advantage of building its own hardware. With Samsung planning an LLM for its devices, Google adding its AI chatbot Bard to the Pixel, and even whispers of Apple working on a ChatGPT competitor, it could mean a shift in the generative AI landscape.

Actually, Samsung Gauss comes in three specialized models: Samsung Gauss Language, Samsung Gauss Code, and Samsung Gauss Image. The language model works like ChatGPT and will be used for writing text, summarizing documents, and translation. The coding model will be used to help developers write code, and the image model has multi-modal support, meaning it can generate and edit images. Generative AI is poised to revolutionize users’ work and daily lives. Adding LLMs to smartphones would create even more impact and introduce new possibilities for life in the AI era.

Samsung Gauss is currently the model used internally by employees and will expand to “a variety of Samsung product applications to provide new user experience in the near future,” said the announcement.

Tech / Technology

How to share photos from your iPhone with Airdrop

Posted on:

Here’s everything you need to know about sharing pictures, documents, and more via Airdrop.
A hand holding an iPhone displaying an AirDrop preferences menu with a Macbook in the background.

Apple’s AirDrop functionality on its Mac and iOS devices can be used, for free, to share and receive photos, documents, and more with other Apple devices that are physically nearby. It’s a nifty, speedy option that saves you the need to message or email content, instead sending it wirelessly with a few taps of your mobile device or a few clicks on your Mac.

It’s fairly straightforward to utilize. Here’s a walkthrough if you’re struggling to get your head around how it all works. (But also remember: AirDrop has its own privacy flaws.)

Getting started with Apple’s AirDrop functionality

AirDrop uses Bluetooth and Wi-Fi to transmit the content you want to send (or receive), so you need to ensure that the person you’re sending to is nearby and within Bluetooth and Wi-Fi range.

If the person you’re sending to has their AirDrop settings set to receive from “Contacts Only,” they need to have your Apple ID’s email address or mobile number in a contact card for AirDrop to work.

Check that both you and the person you’re sending to have Wi-Fi and Bluetooth turned on. If either of you have “Personal Hotspot” turned on, you need to turn it off.

If you aren’t in the person’s Contacts, they need to set their AirDrop receiving setting to “Everyone” in order to be able to receive the file from your device.

How to use AirDrop on an iPhone 11 or later

Total Time

  • 2 min
What You Need

  • iPhone 11 or later

Step 1:

If you want to share from an iOS app, such as the native Photos app, open the app and hit the share option, then tap the AirDrop option.

Screenshot of an iPhone with the AirDrop button highlighted.

Hello, doggy. Please be Airdopped to my phone.
Credit: screenshot: Apple

Step 2:

If the person you want to share with also has an iPhone 11 (or later) model, position your iPhone in the direction of the other iPhone.Tap the profile picture of its user at the top of the screen. If you see a red numbered badge on the AirDrop button, there are multiple devices nearby to share with.

Step 3:

Tap the AirDrop button, then tap the user that you want to share with. If the person you’re sharing with is in your iPhone’s Contacts, you’ll see a photo with their name. If they aren’t in your Contacts, you’ll see their name with no image.

SEE ALSO: What to do if someone AirDrops you an unsolicited dick pic on public transport

How to use AirDrop on an iPhone XS or earlier, an iPad, or an iPod touch

Total Time

  • 2 min
What You Need

  • iPhone XS or earlier or iPad or iPod touch

Step 1:

Open the app you want to share from. Tap the “Share” option, then tap the “AirDrop” button.

Step 2:

Tap on the name of the AirDrop user that you want to share with.As with iPhone 11, if the person you’re sharing with is in your Contacts, you’ll see an image with their name. If they aren’t in your Contacts, you’ll see just their name.

Screenshot of an iPhone with an AirDrop user's name highlighted.

Again, please AirDrop me dog photos.
Credit: screenshot: apple

How to accept an AirDrop share

When someone shares something with you using the AirDrop function, you’ll get a notification on your phone with a preview of what they are sharing. You can tap “Accept” or “Decline.”

Screenshot of an iPhone displaying AirDrop's "Accept" or "Decline" dialog box.

Accept all dogs.
Credit: screenshot: apple

If you AirDrop something to yourself, like a photo from your iPhone to your Mac, you won’t see an option to Accept or Decline. It’ll be automatically sent to your device as long as you’re signed in with your Apple ID on both devices.

How to adjust your device’s AirDrop settings

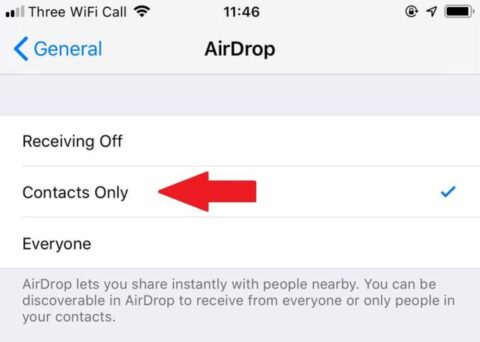
It’s simple to change who can “see” your device and send you AirDrop content. Go to your iPhone’s Settings menu, then open the “General” menu and tap on AirDrop.

Screenshot of AirDrop with the "Contacts Only" option highlighted.


Credit: screenshot: apple

From here you can change between “Receiving Off,” “Contacts Only,” and “Everyone.” We’d recommend going for the “Contacts Only” option to protect yourself from spam or harmful content when out and about.

Tech / Technology

How to stream on Twitch

Posted on:

Here’s everything you need to know so you can start livestreaming on Twitch from your PC, Mac, or mobile device.
Twitch app on a smartphone

If you were unfamiliar with Twitch in the past, you probably know about the popular livestreaming platform now.

The Amazon-owned streaming service has grown exponentially over the years, now with more than 30 million daily viewers and around 7 million creators going live on Twitch every month, according to the platform.

Are you a first-time streamer looking to get in on the Twitch action? Or maybe you’re a longtime YouTuber who feels like Twitch, which focuses on live video, might be a better platform for your livestreams? Then you’ve come to the right place. Going live on Twitch is quick and easy, and we’ll teach you everything you need to know about going live on Twitch.

But, before we dive in, make sure you sign up for a Twitch account first as that’s required for going live. Just go to Twitch.tv and click the Sign Up button in the upper right corner. Choose your username and fill out your personal info and you’ll be ready to go.

Stream from your mobile device

The fastest way to start streaming on Twitch is to go live from your mobile device.

Total Time

  • 5 min
What You Need

  • Smartphone
  • Twitch app

Step 1:

First, download the Twitch app on your smartphone. If you have an Android device, you’ll find the app in the Google Play Store. If you’re an iPhone user, just head over to the App Store.

Step 2:

Next, sign in to your account and tap your profile image in the upper left corner.

Twitch livestreaming options


Credit: Mashable Screenshot

Step 3:

On your account page, click the “Go Live” button.

Twitch account page


Credit: Mashable Screenshot

Step 4:

You’ll then be presented with two options: Stream Games and Stream IRL. The Stream IRL option utilizes your device’s camera.

Twitch livestreaming options


Credit: Mashable Screenshot

Step 5:

If you pick the first option, you’ll be presented with a screen where you pick the game you want to stream.

Choose stream category


Credit: Mashable Screenshot

Step 6:

After choosing this category, you’ll be given options where you can title your stream and adjust the audio volumes for your smartphone’s mic and the gameplay volume.

Stream setup


Credit: Mashable Screenshot

Step 7:

Click on the record button and you’ll see a prompt that lets you know that Twitch will screencast your device to your Twitch livestream. This pop-up warns you that any notifications that show on your screen will be broadcast as well, so it’s best to turn off notifications or turn on “Do Not Disturb” options.

Start Broadcast


Credit: Mashable Screenshot

Step 8:

Tap on “Start Broadcast” and you’re live!

If you choose the Stream IRL option, you’ll be broadcasting yourself from your mobile device’s camera. You’ll receive similar stream options menus where you can set the title of your broadcast and then tap Start Stream to go live.

Go live from your PC or Mac

If you’d like to stream while you’re on your Mac or gaming on your PC, you’re going to need software to broadcast from.

There are popular free options like OBS, which works on both PC and Mac. There are also paid options like the Mac-native Ecamm Live.

However, Twitch now has its own free Twitch Studio application to help you get started on PC or Mac. If you’re just starting out, it’s probably best to use that before you spend money on a third-party app or learn the more complicated OBS software.

Total Time

  • 5 min
What You Need

  • PC or Mac
  • Twitch Studio

Step 1:

First, download Twitch Studio from the official website.

Twitch Studio Setup


Credit: Mashable Screenshot

Step 2:

After you install the software on your PC or Mac, open Twitch Studio and login to your Twitch account. You’ll be greeted with an onboarding prompt that will walk you through connecting your mic and your webcam.

Step 3:

Twitch Studio will also help you make your stream unique with different scenes and customizations. In addition, users can set up on-air Twitch notifications, chat boxes, and more from within the application. Play around with these and change them once you get a hang of how you’ll be utilizing these options during your livestream.

Twitch Scenes


Credit: Mashable Screenshot

Step 4:

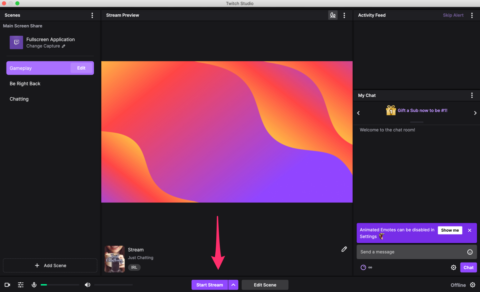
When you’re ready to go live, just click “Start Stream” at the bottom of the Twitch Studio app. Choose your stream category, enter your livestream title, and click “Go Live” to start streaming. 

Twitch Studio dashboard


Credit: Mashable Screenshot

And that’s it! Whether you decide to livestream your favorite game or just go live for a casual chat stream, you now know everything you need to quickly broadcast on Twitch.

Tech / Technology

Apple reportedly pauses iOS 18 development to focus on bugs

Posted on:

Apple is reportedly pausing development of its upcoming iOS 18 software to focus on bugs.
Apple logo

Apple has taken the step of temporarily pausing development of next year’s iOS 18 to focus on fixing bugs in the code.

This is according to a new report by Bloomberg’s Mark Gurman, who claims the delay was internally announced to employees last week.

The version of iOS that’s currently available to the public is iOS 17.1.1, but Apple is already at work on iOS 18, which is likely to be launched in 2024. However, early versions of iOS 18 were so buggy that Apple decided to halt further development until the company’s engineers iron out the bugs and improve the software’s performance.

The report calls the move “rare” and “unusual,” while noting that Apple’s recent releases weren’t as buggy — though we’re not sure all users would agree, given the amount of bugs found since iOS 17’s launch.

The pause in development will reportedly only last a week, after which work on new features will resume.

The report also claims that Apple briefly stopped the development of iOS 17.4, which is due for a release in March. Finally, the delay also affected the development of Apple’s visionOS, which is the software platform for the company’s upcoming Vision Pro headset. However, the delays were brief, and are unlikely to postpone consumer releases of any software.

Tech / Technology

Best cheap VPN in November 2023 (UK)

Posted on:

The best cheap VPNs deals, including popular services like ExpressVPN, NordVPN, and Surfshark.
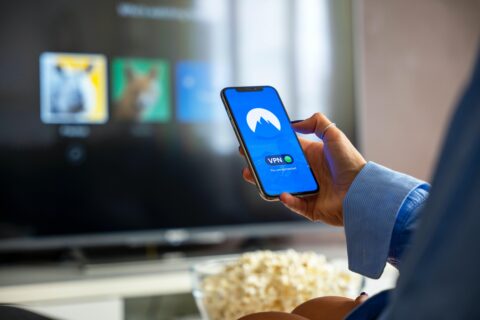
NordVPN on phone

The best VPNs aren’t necessarily the most expensive. Some of the best VPNs are actually really affordable, which is great news for anyone looking to secure cheap online security, data protection, and increased streaming options.

You have come to the right place if you’re looking for a premium VPN with advanced features, without the big price tag. We’ve lined up some great value options for absolutely everyone, and there is no need to compromise on security, connection speed, customer support, or anything else.

But first, there are a few things we need to cover.

What is a VPN?

Virtual Private Networks (VPNs) provide valuable protection for your data and identity when you’re navigating the online world. How do they do this? VPNs offer online privacy and anonymity by creating a private network that hides your real IP address and makes all of your information unreadable.

All of your activity is untraceable and secure, because your online traffic passes through an encrypted tunnel. Everything inside the tunnel is protected against online threats like viruses, hackers, and malware. VPNs are primarily designed to provide online security, but there is another reason that millions of people use these services.

VPNs can also be used to stream movies and shows from around the world, and the process is actually really simple. We’ve already mentioned how VPNs provide anonymity by hiding your real IP address. Well, this technique can also be used to manipulate the streaming market. By hiding your real IP address and connecting you to a server in another location, you can trick your favourite streaming sites into thinking that you are based in a different country. This provides access to all the extra content that would normally be restricted in your location.

Should you use free VPNs?

The question that everyone wants an answer to is whether you actually need to pay for a VPN. There are plenty of free VPNs out there, but do these offer the features you need to browse, shop, and stream securely? Unfortunately, there is often a catch with free versions (usually in the form of a limitation on your data usage or connection speed).

Occasional users will probably be satisfied with a free VPN, but if you’re going to be streaming or downloading on a regular basis, you should look elsewhere. The only exception to this rule is a free trial. These come without limitations, but obviously don’t tend to last for a long time.

The conclusion is that the best option for securing your data and streaming more content from around the world is with a paid subscription. The sad fact is that you’ll have to pay to gain access to advanced security features without limitations on your usage. It’s not all bad news though, because there are plenty of cheap plans out there, especially if you’re willing to commit to a lengthy contract.

What should you consider before subscribing to a VPN?

The process of actually selecting a VPN can be seriously tricky, especially if you don’t know what to consider. Most of the best VPNs offer many of the same features with similar packages, so it’s important to know what matters.

To make your life a little bit easier, we have shortlisted a few things to consider before making any sort of decision:

  • Network size and location — The best VPNs offer a large network of geographically diverse servers. The more servers (and server locations) offered by a VPN, the more likely you are to find a reliable and fast connection. This is also particularly important for streaming, as you should always be able to connect to a server in the country with the content you want to watch.

  • Trustworthiness — We recommend finding an experienced provider with a strong track record and a clear privacy policy. It’s important that your VPN of choice guarantees your data won’t be logged or collected. If it isn’t obvious what happens to your data, you should steer clear.

  • Jurisdiction — It’s a good idea to look for VPNs based in the British Virgin Islands, Panama, Switzerland, and other privacy-friendly countries. VPNs based in countries that fall under the jurisdiction of the intelligence-sharing alliances should be avoided: the U.S., UK, Canada, Australia, New Zealand, Denmark, France, Norway, the Netherlands, Belgium, Germany, Italy, Sweden, and Spain. VPNs in these countries can be forced by authorities to collect and hand over user data.

  • Customer support — VPNs can be difficult to understand if you’re not an experienced user, and even if you are, problems can occur. Whether you’re a total beginner or not, customer support is key for dealing with any potential issues that might arise. You should also consider whether customer support is offered by phone, email, or web chat.

Make sure you carefully consider these features before deciding on the VPN that suits you and your lifestyle. Once you have narrowed down your options, you can begin the process of finding the best deals.

What is the best VPN?

We’re sorry to burst your bubble, but there isn’t one VPN that stands above all the rest. The best VPN for you really comes down to your own set of personal preferences. Once you find a few options that tick your boxes, you need to consider the best deals.

We have reached out to partners in order to provide you with market-leading prices on VPN subscriptions, with performance and security in mind. All of these VPN services have been handpicked not only because of the prices and deals on offer, but because they all offer the most important features to protect your online data and identity.

There are also plenty of services to consider on this list if your priority is unlocking streaming sites like Netflix, Prime Video, and Disney+. Online security should always be the priority, but we know that many subscribers use these services to unlock more content from around the world. We get it, and we’re here to help.

These are the best deals on cheap VPNs in 2023.

Tech / Technology

Apple fixes iPhone’s BMW charging bug with iOS 17.1.1

Posted on:

Apple has released iOS 17.1.1, an update that fixes several iPhone issues, including a bug that prevented wireless charging in BMWs.
iOS 17

Apple’s got an update for the iPhone, and this one will be of particular interest to BMW owners.

The new iOS 17.1.1 update fixes an odd bug that disables the phone’s NFC chip after you wirelessly charge the iPhone in a BMW. While that may sound innocuous, the fact that some BMW owners were unable to use Apple Pay or their digital car key after charging their phone was quite a nuisance, especially because the issue persisted after a factory reset of the phone.

The iOS update also fixes a bug in which the Weather widget on the Lock Screen inaccurately displays snow.

Apple also updated iPadOS to version 17.1.1, macOS Sonoma to version 14.1.1, remedying unspecified issues and bugs.

Apple’s HomePod also got an update, with the new version being 17.1.1. The new software fixes a bug in which the HomePod sometimes responds slowly, or fails to complete requests.

Finally, Apple Watch also got an update, bringing the watchOS software to version 10.1.1. Apple says that this update fixes the battery drain bug that some users experienced after upgrading to watchOS 10.1.

Tech / Technology

How to watch BBC iPlayer for free

Posted on:

Unblock and watch BBC iPlayer for free from anywhere in the world.
Laptop on desk

TL;DR: ExpressVPN is the best service for unblocking free streaming services. Access BBC iPlayer from anywhere in the world with ExpressVPN.


BBC iPlayer is one of those annoying streaming services that recognises your location when you attempt to stream, and blocks your access if you’re connecting from outside the UK. Geo-restrictions are a pain, but there’s a workaround that can secure your access from anywhere in the world.

If you want to access BBC iPlayer from anywhere in the world, we have all the information you need.

How to unblock BBC iPlayer for free

VPNs can hide your real IP address (digital location) and connect you to a secure server in the UK. This quick and easy process tricks sites like BBC iPlayer into providing you with access from anywhere in the world.

Unblock and watch BBC iPlayer by following these simple steps:

  1. Sign up for a VPN (like ExpressVPN)

  2. Download the app to your device of choice (the best VPNs have apps for Windows, Mac, iOS, Android, Linux, and more)

  3. Open up the app and connect to a server in the UK

  4. Visit BBC iPlayer

  5. Stream on BBC iPlayer from anywhere in the world


ExpressVPN logo

Credit: ExpressVPN


ExpressVPN (1-Year Subscription + 3 Months Free)

£82.82 only at ExpressVPN (money-back guarantee)


The best VPNs for streaming are not free, but most of the best VPNs do offer free trials or money-back guarantees. BY leveraging these offers, you can unblock BBC iPlayer without committing with your cash. This isn’t a long-term solution, but it works well if you’re travelling or just want to watch a particular show or sporting event.

What is the best VPN for BBC iPlayer?

The best service for unblocking BBC iPlayer is ExpressVPN, for a number of reasons:

  • Servers in 94 countries including the UK

  • Easy-to-use app available on all major devices including iPhone, Android, Windows, Mac, and more

  • Strict no-logging policy

  • Fast streaming speeds

  • Up to five simultaneous connections

  • 30-day money-back guarantee

A one-year subscription to ExpressVPN is on sale for £82.82 and includes an extra three months for free — 49% off for a limited time. This discounted plan includes a year of free unlimited cloud backup and that 30-day money-back guarantee.

Unblock BBC iPlayer for free with ExpressVPN.