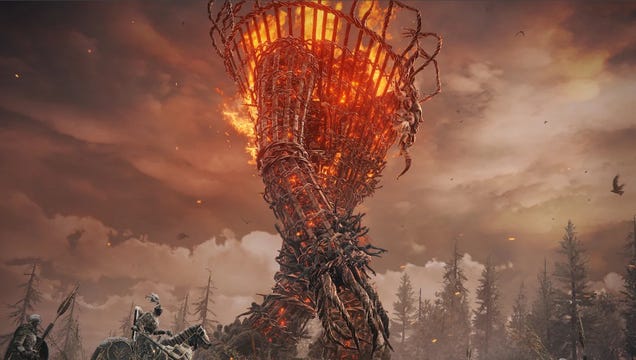

There’s a ton of new stuff to enjoy in Elden Ring: Shadow of the Erdtree, the massive new DLC from FromSoftware. But aside from the very pretty Gravesite Plains, and one of those annoying chakram ninja things, the very first thing you’ll notice when you step into the Realm of Shadow is a massive, walking Wicker Man on fire, and a village that’s been reduced to ash. Kinda makes you wonder if those two things are related.
Suggested Reading
Suggested Reading
Either way, like most things you meet in Elden Ring, if it’s moving, it definitely needs to die, but just walking up and trying to stick a sword in these guys is an easy way to end up extra crispy inside your own armor. Just ask any of the poor bastards whose charred corpses are actually sticking out of these things as they walk around. There’s a bunch of these guys roaming the land, too, some of which are very much blocking your way to the critical path, so knowing how to deal with them is an especially vital skill. As a famous bear once said, only you can prevent forest fires, so here’s everything you need to know about how to make that bear proud.
Advertisement
Furnace Golem abilities
The problems with these guys start when you’re within a football field away from ‘em, as they can kick up a ton of flaming dirt that can be a one-hit kill early on in the DLC. The ones that don’t kick up a firestorm basically spew it from the basket on top of their heads, which is worse, since those flames will actually follow you a bit. At the very least, by the time you get to those guys, you should have a few Scadutree Fragments, and there’s a chance you might actually survive the barrage. There’s only a couple that do this–most notably, the Golem across the broken bridge over at the Ancient Ruins of Rauh–but there’s also a rare attack where the Golem will go full Godzilla, and breatheheat attack at you that can travel a preposterous distance across the map.
Things actually get a little simpler once you’re up close and personal with these things, where all they do is try to stomp on you. The issue there is each stomp creates a wave of fire across the ground. If they leap and stomp, it creates an explosion you can’t jump. They can also kneel down and try to grab you. If they catch you, they’ll throw you in their head basket and that’s an instant kill. If you’re in an elevated position, they’ll try to punch you instead.
Advertisement
Some tips for beating Furnace Golems
These guys will often be in wide open areas, virtually by themselves, and if they aren’t they usually trample over or burn any other enemies in the vicinity for you. That’s especially helpful for the Golem at the front door of the Shadow Keep, since there’s an entire encampment of soldiers hanging out at his feet who get absolutely bulldozed when he makes his way downhill. In the open areas, take advantage of the espace.
Advertisement
The other good news is, yes, you can summon Spirit Ashes once you’re within a certain range of a Golem’s stomping grounds. Unfortunately, for the most part, Spirit Ashes are more bait than anything else. They’re gonna have even more trouble getting close to these things than you do, but having them there to pull aggro will buy you a couple of minutes.
As you might’ve guessed, for the ones out in fields, your very first move will be to make your approach on Torrent, circling towards the Golem, and boosting speed when you see his leg rearing back to kick some dirt, or when his head starts erupting. Once you’re close enough, you’re gonna want to stay on Torrent for the extra mobility, and keep behind the Golem as much as possible. If you’re not already, get real good with cornering. Turning on a dime is gonna be crucial. The double jump is the real game-changer, though, since that mostly makes the fight a lethal game of double dutch. The leaping stomp can be a minor problem since you can’t leap over the explosion that it makes at close proximity, but it’s extremely well telegraphed, and being on Torrent means you can boost yourself out of the blast radius in a hurry.
Advertisement
Now, ultimately, the real target on these guys is the bearded face at the front of his basket. As you might’ve noticed, it’s a little high up. If you’re trying to make things harder for yourself, you can try firing projectiles directly at the face while on horseback, but the real move here for most of these guys is to target the Golem’s legs. At first, it’ll seem like you’re only doing chip damage to this thing, since the life bar on the legs doesn’t budge much, but, we assure you: keep at it. You’re not trying to dismember this guy, you’re trying to build up enough stagger to get the Golem to drop to one knee.
To that end, we recommend trying to work on one leg at a time, but, if you’ve got a shot at a clear hit, take it. We recommend your strongest and/or longest sword for this, but timing is everything, and some of the best swords for crippling the Golem’s stance are also the ones that lock you into a swing animation, right when the Golem’s about to stomp. Plan accordingly before committing to any strike.
Advertisement
What you ultimately want, however, is to get one leg to stagger, then start working the other. If the Golem gets back up, breaking the same leg won’t have the direct effect you’re looking for which is that, when both legs have been staggered, the Golem will full-on faceplant into the dirt. Once it’s down, ride up to its face and give it a riposte, which will knock off around half its health. Don’t worry if you have to ride around it a bit to find where the face landed, the stagger time on this guy is pretty generous. Worst case scenario is if you’re fighting on uneven terrain, and the riposte can’t trigger. In those cases, don’t waste the opportunity, hit the face with your bigger attack, as you can still do some serious damage while he’s grounded. If you’re ambitious, and you’ve been using the Starscourge Greatsword (it does the most stagger damage, but the swings are slow), landing both hits of Starcaller Cry can wipe out almost half its health.
The Furnace Pot solution
“Oh crap,” you say, “this Furnace Golem has armor on its legs! Now what?!” That, friends, is your cue to take the high road. The armored Golems are always close to a rise of land that puts you above their heads. It’s never an easy trip, since those Golems typically spam the eruption attacks more than anything, but once you make it to the top, what you’re actually looking to do is toss Fire or Furnace Pots into the Golem’s head basket, while dodging the flame attacks and the Golem’s big swinging punches. Why does fire do the most damage to a thing that’s already on fire? One of life’s little mysteries, I suppose.
Advertisement
Your reward for all your hard work is always a brand-new Crystal Tear–some of which are absolutely game-breaking with the right builds–and a Furnace Visage which, once you have the recipe, can help you craft another Furnace Pot to take down the next Golem.
