So, you can’t quite figure out how to connect your AirPods to your computer. Stuff happens! It’s OK, because the problem is easy enough to solve.
We’ve got a quick rundown for you, but there’s also a helpful page from Apple itself that can point you in the right direction for any model computer.
Now, first things first. The process of pairing your AirPods (2nd and 3rd generation) or AirPods Pro (1st and 2nd generation) via Bluetooth might look different depending on what type of computer you use. Let’s go with a Mac first.
How to connect AirPods to a Mac
First you want to make sure that your Mac’s operating system is up to date. To do that, click on the Apple icon in the upper left hand corner of your desktop screen and click on “About this Mac.” A screen will pop up, and there you can click on “Software Update.”
It’s always best to update to the latest, which is macOS Sonoma 14.4.1. According to Apple, 2nd generation AirPods require macOS Mojave 10.14.4 or later (3rd generation needs macOS Monterey or later), and AirPods Pro require Catalina 10.15.1 or later (2nd generation needs the latest, Sonoma).
Mashable Light Speed
Now that you’ve made sure your Mac is up to date, follow these simple steps to connect your AirPods.
- AirPods
- Mac
Step 1:
Open System Preferences.
If you can’t find it, it’s the icon on your desktop that looks like a gear. You can also search for System Preferences using Spotlight (the magnifying glass in the upper right hand corner of your desktop.)
Step 2:
Select Bluetooth.
I happen to use a Mac, so here’s what I’m talking about. This is the icon you’re looking for.

The Bluetooth icon is easy to find in system preferences.
Credit: Screenshot: apple / system preferences
Step 3:
Place both AirPods in the case and open the lid.
Simple enough.
Step 4:
Hold the button on the back of the AirPod case.
You should see the light start to blink white. Once it does, you can let go of the button.
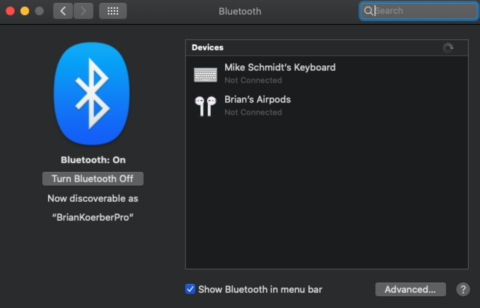
Step 5:
Wait for your AirPods to show up on your devices, then click Connect.
Presto. That should be it. Note: If you do not see your AirPods, double-check that Bluetooth is turned on, then restart the process.

Connecting AirPods to your Mac is easy.
Credit: Screenshot: Apple
Now, what if you don’t use a Mac? Well, the process should be pretty much exactly the same. Pretty much.
How to connect AirPods to a PC or Windows laptop
The only thing that’s really going to change is how you navigate to the Bluetooth page. Here’s a few different ways you might get there:
- AirPods
- PC or Windows laptop
Step 1:
On a PC, open Settings from your Start menu.
Step 2:
Select devices, navigate to Bluetooth and other devices, then hit the plus sign where it says “Add Bluetooth or other device.”
Step 3:
Open the AirPods’ case lid, hold the button, and select your AirPods once they pop up on the screen.
Step 4:
The headphones should connect, then you’ll click “Done.”
Not all PCs come equipped with Bluetooth, especially desktops. However if you have a laptop, it’s quite likely that your PC does have Bluetooth capabilities.
There you have it, folks. Enjoy your brave new world in which your AirPods pair seamlessly with your computer.
Meanwhile, if you want to properly clean your AirPods, reset them, or even stick them to your MacBook screen, we’ve got you covered.